|
| |||
| Home | The Game | Finding a Race | Community | |
|
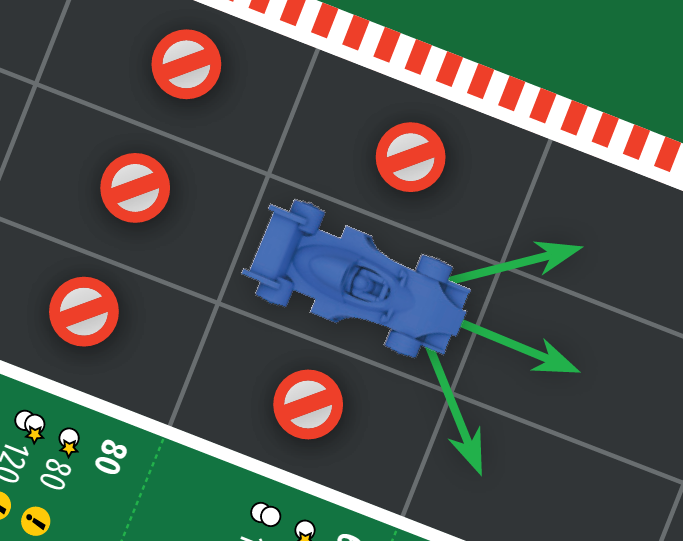
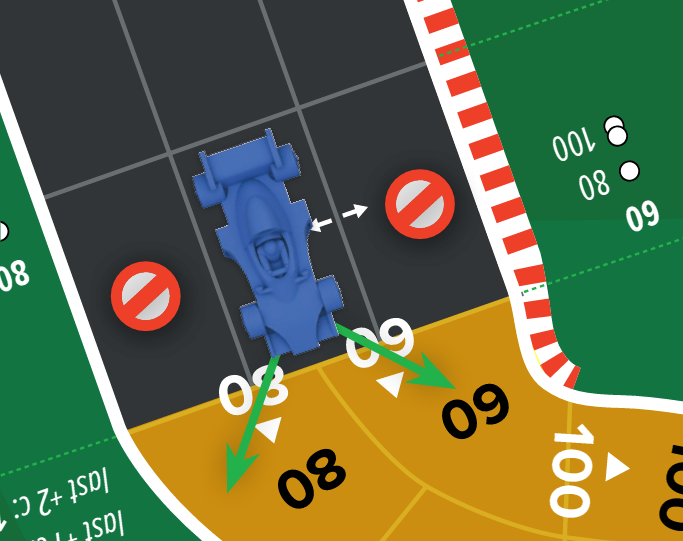
Championship Formula Racing is simulation of the highest levels of international open-wheel racing from the driver's perspective. The TrackEach track in Championship Formula Racing is different � lending themselves to different strategies and car designs. Before we discuss car design and strategies lets describe how movement works. MovementYour car�s speed determines how many spaces it will move this turn: 1 space per 20 mph. Don�t worry about remembering that, it is written on your speed cards. Cars can only move forwards � straight ahead or diagonally. In the examples below, green arrows point towards spaces that the blue car can move to. Red circles mark spaces that the blue car cannot move to.
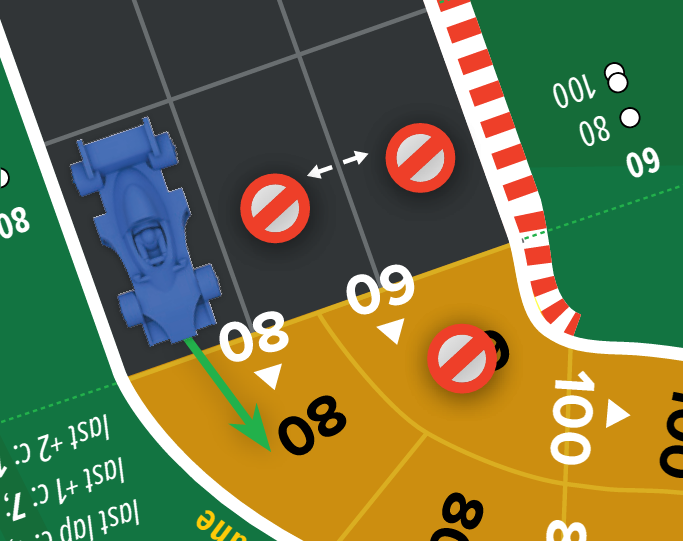
To the right is another example that did not make it into the Rule Book published in the 2016 edition. A car cannot end its move in a space that another car occupies. A car can move through a space that another car occupies, but only after successfully making a forced pass roll. (See rule clarifications.) SpeedAt the end of each turn you will have a speed card face down in front of you. This was your speed at the end of last turn. From turn to turn you can change your speed based on 3 of your car�s attributes: Acceleration, Deceleration, and Top Speed. Remember that you can always got the same speed as last turn. Increasing Your Speed: Acceleration and Top SpeedYou can increase your speed by any amount up to your Acceleration. If your car went 100 mph last turn and you have an acceleration of 60, you can go as fast as 160 next turn. You can also go 120 or 140 as well. You may not go faster than your top speed, even if your acceleration would otherwise allow it. You can exceed your acceleration by 20 mph once per turn by rolling a test. If your acceleration is 40 and you pass the test roll you can increase your speed by up to 60 mph this turn. However you can damage your car if you fail the test. You can increase your top speed in the same way. More about tests and die-rolls later. Decreasing Your Speed: DecelerationYou can decrease your speed by any amount up to your Deceleration. If your car went 100 mph last turn and you have a deceleration of 40 you can slow to 60 or 80 next turn. It is possible to slow down more than your deceleration by spending wear and/or testing your deceleration. Testing deceleration works in the same way that testing acceleration or top speed does. Using 1 wear allows you to slow down an additional 20 mph. Using 2 wear allows you to slow down an additional 40 mph. Testing and spending wear can be combined:
You may never choose to decelerate 80+ mph but sometimes you are forced to. It is also possible to slow down after you start to move using late braking. You must move at least one space before late braking. The cost to late brake is the same as exceeding deceleration. See rule clarifications at the end of this book for more information. SlipstreamsWhen cars are going fast enough a trailing car can sometimes gain extra spaces from a slipstream. You may gain a slip if:
The number of spaces you can gain is based on the speed of the car directly in front of you at the beginning of their move. All spaces are optional.
CornersCorners are what keep you from going your top speed around the entire track. Corners are typically why you sometimes need to slow down and sometimes need to speed up. A corner is defined as a group of contiguous spaces with yellow backgrounds and speeds printed on them. Usually, the spaces in a corner will not line up. Consequently once you pick a lane for a corner you are usually stuck in that lane until you exit the corner. But that is not always the case. 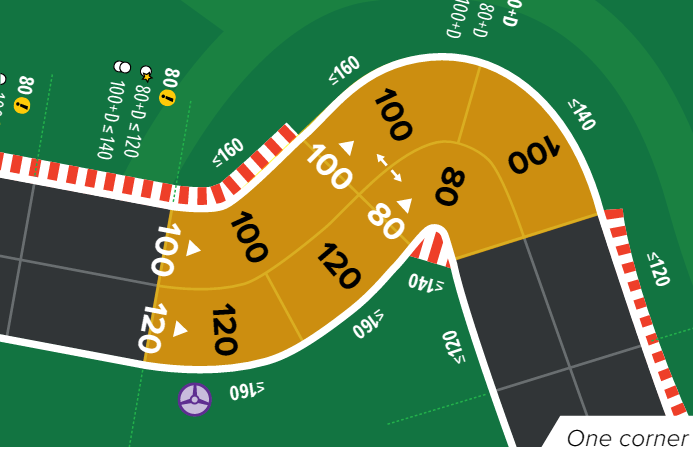 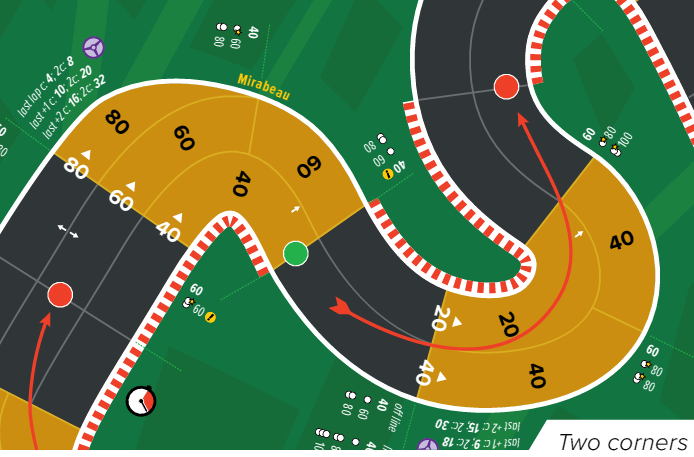 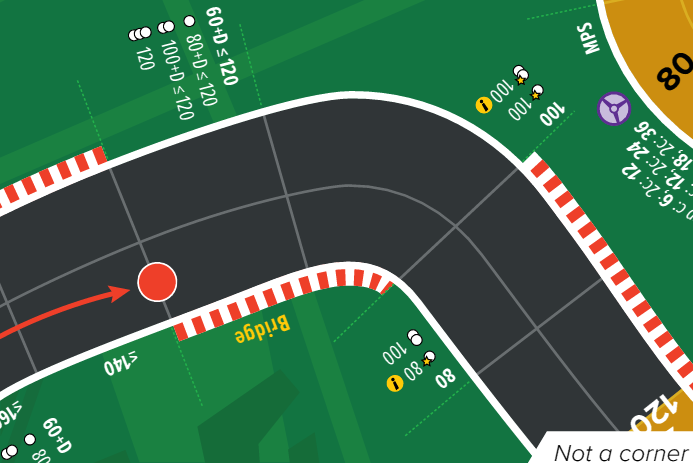
Corner Speed Limits
The speeds in each corner space are limits that apply to any car that enters that space. You can exceed speed limits by spending wear and/or rolling a chance. This payment occurs once per corner. For example: if I enter a corner through a 60 space at 80 mph, I can pay 1 wear to cover that cost. I am now free to continue moving through the corner without paying any more as long as my speed does not exceed 20 mph more than the speed limit of any space I enter. If I enter a space inside the same corner that has a lower speed limit, I must supplement my payment for this corner to cover the difference. For example: if I enter a corner through a 60 space at 80 mph, I can pay 1 wear to cover that cost. If I then move into a different space in the same corner that has a speed limit of 40 I will now have to pay an additional wear or roll a chance. After paying that cost, I can now continue through the corner without paying any more as long as my speed does not exceed 40 mph more than the speed limit of any space I enter.
If you do not have enough wear to pay for a corner even if you roll a Chance, you automatically end up in the gravel beside the corner and are removed from the race. Unlike a crash that results from a chance roll, ending up in the kitty litter does not involve other cars. ChancesA chance roll is one of the most risky die rolls. Green results mean that the chance was a success. A yellow result means that the car has spun out. A red result indicates that the car has crashed. See rules clarifications at the end of this book for more information. Red Lines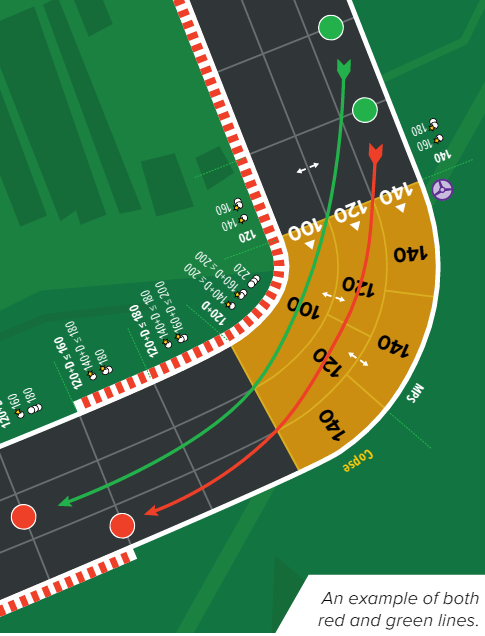
Many corners have red lines running through them (you can see red lines in the example corners above and on the right). Some corners have more than one red line. These lines represent the ideal path through the corner. If your car follows the entire red line through a corner then the speed limit of spaces you enter are considered to be 20 mph faster then what is written on the track. For example: if I follow a red line into a corner at 100 mph and enter that corner through a 60 space I would only need to pay 1 wear to cover that cost. By following the red line, I consider the speed limit of that space to be 80 mph instead of 60. If a car leaves the line before its end, it must retroactively adjust its payment for the corner as if it had not used the line. If a chance roll is required due to leaving a line before it ends results in a spin or a crash, that result occurs in the last space that the car was still on the line. Green LinesGreen lines work exactly like red lines except that spaces you enter while following a green line are considered to be 40 mph faster then what is written on the track. WearWear is a point pool that represents your tires. You start the race with an amount of wear based on your car�s wear attribute times the number of laps that this race will run. The main use for wear is to allow you to go faster in corners. It can also be used to slow down more than your deceleration or to late brake. Changing Speeds in the Middle of a CornerIf you are in the middle of a corner you can increase your speed OR you can pay more for the corner BUT you can not do both. This means that you if you start your turn in the middle of a corner you often must remain at your current speed or slow down. However, you MAY increase your speed if you can do so WITHOUT paying additional wear, rolling a chance, or automatically leaving the track for being 80+ over the speed of a corner space. You can always slow down in the middle of a corner. Corner ExitBecause speed limits only limit a car when the car enters a corner space, a car that ends its turn on the last space of a corner is no longer limited by the speed limits of that corner. Game Turn OverviewEvery turn in CFR has three phases. In the Planning phase everyone will secretly select a speed for their car. After everyone simultaneously reveals their speeds, the Movement phase begins. Then speed cards are reset in the Clean Up phase and planning for next turn can begin. In the Movement phase everyone moves their car. This is done in order starting with the current leader of the race. Planning Phase
Every driver in CFR gets a deck of speed cards numbered 20 through 220 representing every possible speed that a car can go. One of those cards will be face up on the table in front of you representing the speed your car went last turn. If you went 0 mph last turn or this is the first turn of the race there will not be a speed card face up in front of you. During the planning phase, you will place a different speed card face down in front of you. If you want to go the same speed as last turn, you will play the "Maintain Present Speed" card. If you plan to test an attribute this turn, the speed card you play face down should represent the speed that you hope to go if your test succeeds. First TurnWithout testing, your first turn speed may not exceed your start speed. For your first turn, your acceleration does not limit your speed. Your start speed can be tested in the same way as your acceleration, deceleration, and top speed. On the first turn of the race, a car with a 100 start speed could not go faster than 100 mph without testing. Although you rarely want to you can go slower than your start speed on your first turn.
Move PhaseCars in front move first. Among tied cars, the fastest car moves first. Among tied cars with the same new speed, the car closest to the red and white stripes on the side of the track moves first. Clean UpAfter all players have moved, each player picks up any extra speed cards, leaving in front of them only the speed card representing the speed they finished the turn at. WinningAfter a pre-determined number of laps, a car that ends their turn on the last space before the finish line (nose across the line) or any space after the finish line has finished the race. The car that travels the farthest past the line that turn wins the race. Ties go to the car that ends the race closest to the grey bar on the side of the track. If cars enter a corner after finishing the race, they must deal with the speed of that corner as they normally would.[ed. note: moved up from clarifications.] Rolling Dice: Tests and ChancesThere are a number of times when you can roll dice to push the limits of your car during the course of a race. Note that the colors were inconsistently removed from parts of the 2016 edition of the published rules. Where colors are referenced below green is a success, red is a failure, and yellow is a partial failure. This matches up with the color coded die roll chart not included in that publishing. TestsWhen you test you can exceed an attribute (acceleration, deceleration, top speed, or start speed) by 20 mph for this turn but you can damage your car for the rest of the race if you fail. The result of a test is determined by the roll of two dice. Compare the total to the Die Roll results. A green result means that the tested attribute gains 20 mph for this turn. A red result means that the test was a failure and the tested attribute is usually reduced by 20 mph for the rest of the race (place a -20 damage marker on top of the attribute card). Below are clarifications. Running Out of WearA couple results in the tables require you to pay a wear. If you do not have the wear to pay, you automatically spin in addition to any other results the table stipulates. Acceleration Or/Then Top SpeedIf you are testing both acceleration and top speed on the same turn, test your acceleration first and then test your top speed if your acceleration test succeeds. Damage to Acceleration or Top SpeedIf you damage either acceleration or top speed, the next damage to either will result in engine failure and your car being removed from the race. For example, if you have damaged acceleration from a previous test and later damage your top speed, you car will be removed from the race. Your Speed After Failing Acceleration, Top Speed, or Start Speed TestsIf you fail an acceleration, top speed, or start speed test, remember that this happens before you move -- change your speed card to note your actual speed and move only that number of spaces. ChanceA Chance is one of the most dangerous rolls. usually used to help pay for exceeding the speed limits in a corner. A yellow result means that the car spins. A spun car stops in the first space that required the chance roll and picks up their speed card as they are now going 0 mph. A red result means that the car crashes and is out of the race. Take note of the row where the crash occurs. Cars that subsequently enter that row this turn can become involved in the crash. See clarifications for more on spins and crashes. SkillBEFORE you roll a test, chance or forced pass you can use skill to improve your chances. A car�s skill attribute provides that driver with skill chips that can be used during the race. Before a die roll, you can use 1 green skill chip to reduce the result by 1 or 2 green skill chips to reduce the roll by 2. You may not use more than 2 green skill chips before any one die roll. Cars with more skill will also receive a fixed number of special red -3 chips as stated in the smaller note on the skill attribute card. Before a die roll you can use a red skill chip to reduce a die roll by 3. You may not use more than 1 red skill chip and you may not use a red skill chip in addition to any number of green skill chips. At any time you can exchange a red skill chip for 3 green skill chips. Race Set-UpA shorter race or a race with fewer cars will feel very different from a longer race or a race with more cars.
Track SelectionSelect a track to race on and place that track�s board in the middle of the playing area. Determine the Number of LapsEach lap takes between 30 - 60 minutes depending on the number of cars and the experience of the drivers. A race can be any agreed length. A one lap race will encourage a sprint mentality and make it harder to catch up from a start at the back. A four lap race will provide a lot more time for slower strategies to play out. Hand Out EquipmentEach driver should grab the following:
Car SetupThe Driver deck includes 4 cards for each of the 6 attributes. Each player privately picks one card for each attribute. The total of the set-up points shown on each selected cards should equal 2. When all players are ready, reveal the Driver cards for each car arranged so that everyone can easily see them. Place the unused setup cards face down next to you car�s setup to show that car�s color. 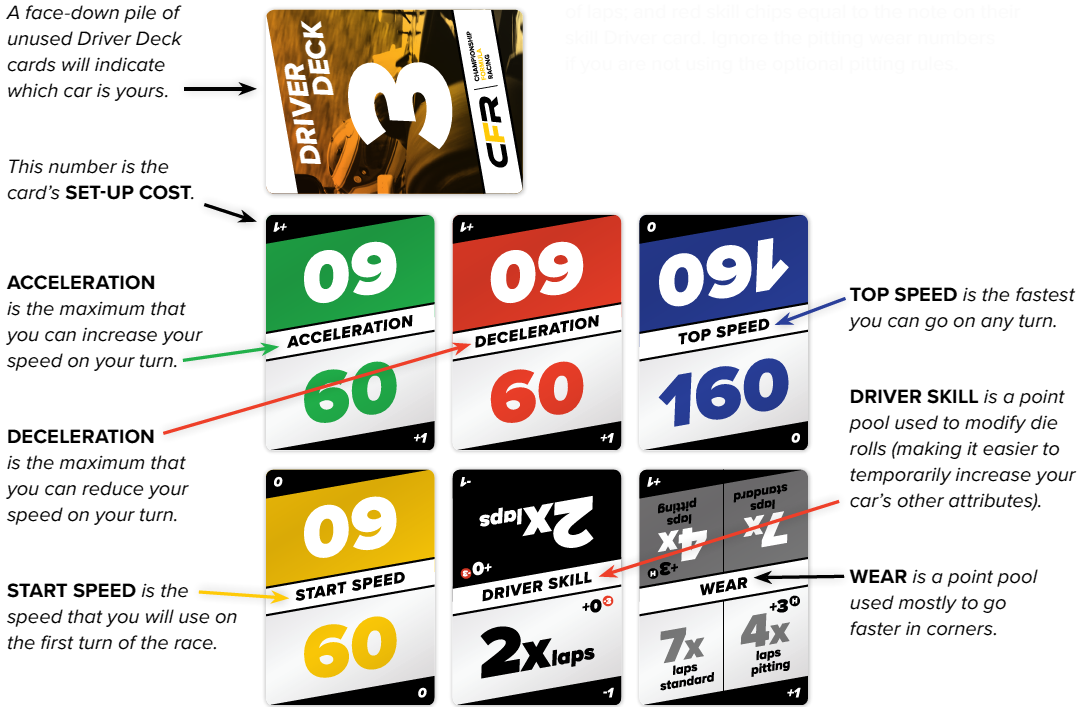 Every car then receives wear chips equal to their standard wear rating times the number of laps; green skill chips equal to their skill rating times the number of laps; and red skill chips equal to the note on their skill Driver card. Remember to ignore the pitting wear numbers if you are not using the optional pitting rules. Pole Bid
Cars are assigned to the starting grid based on a secret and simultaneously bid using wear and/or skill. Each driver takes any amount of wear and skill chips into a hand and holds it out in front of them. When everyone is ready, all bids are revealed. One skill equals 1/2 wear. Break ties with the roll of two dice. Skill cannot be used to modify a tie-breaker. This is the only time that skill cannot be used to modify a die roll. Cars are placed on the start grid in order of pole bid: highest bid in the 1st spot, right behind the start line on the red and white striped side of the track. Below is a chart that shows car positions depending on the number of cars in play (indicated in yellow). 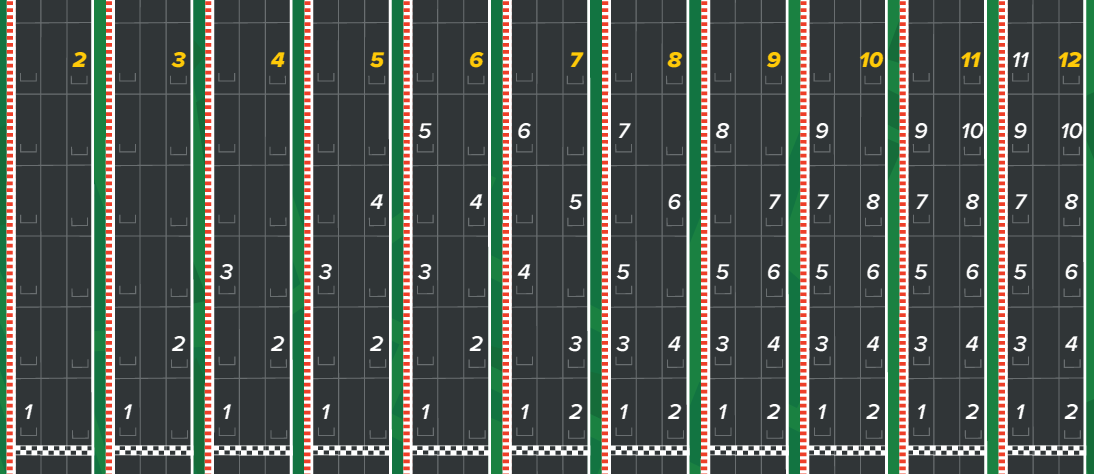
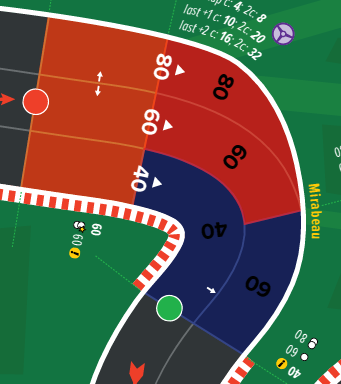
Race StewardsHaving a race steward is not required, but can help keep things moving especially when there are a lot of drivers. Usually, the most experienced player is assigned the role of race steward. The race steward should prompt everyone to start the planning phase, check to see when everyone is done planning, and when it is someone�s turn to move. They can also help people with their moves and the rules, and adjudicate any disagreements. ClarificationsThe rules above cover 90% of the situations you will encounter in Championship Formula Racing. The clarifications below will be needed occasionally to very rarely. Forced PassingIf one car wants to move through a space occupied by another car, a forced pass muct be attempted. During a forced pass attempt, the car that is moving through the blocked space is called the attacker and the car that currently occupies that space is called the defender. Before the attacker rolls dice, the defender has to decide whether they are going to block the pass attempt. If the defender is currently going 0 mph (possibly because of a spin) then the defender cannot block. Blocking makes the die roll more difficult but also introduces the possibility that the cars could collide and lose wear. After the defender decides to block or not, the attacker must decide how much if any skill to apply to this die roll and then make the roll. A green result means that the car has moved through the occupied space and may continue moving if possible. A red result means that the attacker must stop in the last space it occupied prior to the forced pass attempt. The attacker is done moving this turn. The attacker must now reduce its current speed to reflect the number of spaces it did move this turn. If the attacker moved 3 spaces before attempting a forced pass, the attacker must reduce its speed to 60. This will require late braking. If the attacker used spaces gained from a slip in order to make a pass possible, the attacker will need to slow to a speed minus the spaces it gained from the slip. For example, if the attacker moved 5 spaces before the pass attempt, but took 1 slip as part of its attempted move, then the attacker would have to slow to 80 (4 spaces plus the 1 slip space). If the defender chose to block, there is the possibility that there will be contact between the cars. After the result is determined, look at each of the two dice rolled. For every �3� showing on these two dice, the defender losses a wear. For every �4� showing on these two dice, the attacker losses a wear. This penalty occurs regardless of the result of the pass. I should probably add an example here.If a car cannot pay wear after a forced pass attempt, that car spins. Forced Passing in a CornerThe attacker in a forced pass may not use a racing line through a corner. A defender that is using a racing line may continue to use the racing line regardless of whether a block was declared. Unless the forced pass is a success the attacker in a forced pass does not enter the space that the defender occupies, or any of the spaces after. From a timing perspective, a driver must deal with any corner spaces he enters before a forced pass first, then deal with the forced pass, then deal with the space the defender occupies and any spaces after that. In the example below on the left, the yellow car is going 120 and has 3 spaces left to move this turn. If yellow decides to take the 60s for 2 wear and a chance, yellow would pay that cost first before worrying about forced passing red. If yellow crashes or spins, that happens in the space behind red and there would be no forced pass this turn. 
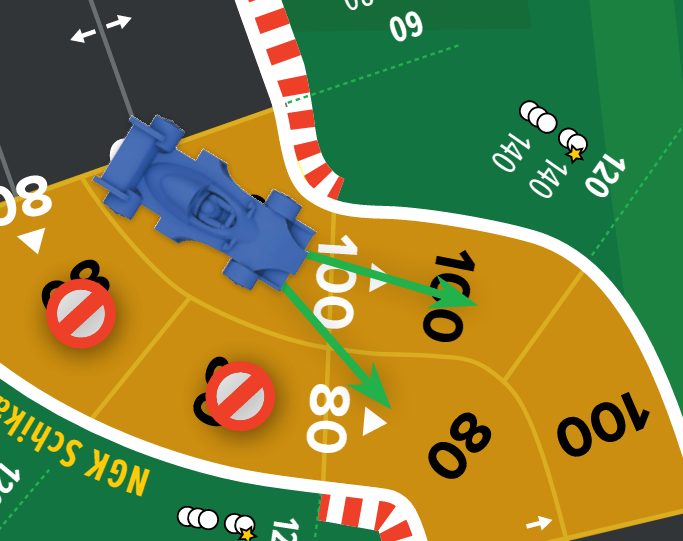
In the example above on the right, the yellow car is going 100 this turn and has two more spaces left in its move. Yellow decides that it wants to forced pass red through the 40 space that red is currently sitting on. Since the forced pass happens in the first space of the corner, yellow will attempt the forced pass before dealing with the corner. If yellow succeeds with the pass, then yellow would have to pay 2 wear and roll on the chance table to take the corner at 100 through the 40 space. If yellow fails at the pass, then yellow will not have to pay wear or roll a chance for the corner. If yellow succeeds at the forced pass but then crashes, red is NOT affected by the crash and does not have to roll crash avoidance. If yellow succeeds at the forced pass but then spins, yellow would be placed on the 60 space besides red. The general rule is that the spun car in this situation is placed in any empty space in the same row. If there are no unoccupied spaces in that row, move the attacker back another row until an empty space is found (preferably one that the attacker moved through). If there was another car in the 60 spaces next to Red, Yellow would spin into the first 60 space in that outside lane. ... and Racing LinesAs previously noted, the attacker in a forced pass may not use a racing line through a corner. However, they can use the line right up until their forced pass -- leaving the line in the space before their forced pass attempt. If this happens, the attacker must first pay any extra costs for leaving the line before attempting the forced pass. If this requires a chance roll a spin or crash occurs in the last space they were able to use the line (per normal rules for leaving a line). So, if the attacker spins or crashes in this scenario they are not able to attempt the forced pass. Consecutive Forced PassesAlthough very unlikely to occur, it is possible to make multiple forced pass attempts on the same move. That can lead to a situation where the last space a car occupied prior to a failed forced pass attempt is occupied by another car. If that occurs, place the attacker in any empty space in the same row. If there are no unoccupied spaces in that row, move the attacker back another row until an empty space is found (preferably one that the attacker moved through) and reduce the attackers speed another 20 mph for every additional row moved. See late braking for instructions on slowing down in the middle of a move. Late BrakingAfter a car moves at least one space it may late brake. Late braking is a way to slow down after a car starts moving. This can be done for tactical reasons or it can be forced on a driver if the track ahead is blocked. If you plan to late brake during this turn, you should play a face down card based on the speed that you will start your turn � before the planned late braking event. Late braking is similar to exceeding your deceleration. You may spend up to 2 wear to late brake by 20 mph per wear spent. You can also late brake with dice as if testing your deceleration. You can also combine those options. For example: you could spend 2 wear and roll dice in order to late brake by 60 mph. This gets a little more complicated if you exceeded your deceleration at the start of this move. After paying for your late braking with wear and/or a deceleration test replace your speed card with a new card based on the speed you slowed to. Remember that you will only move a number of spaces based on this new speed this turn. Late Braking After Exceeding DecelerationIf you exceed your deceleration at the beginning of a move, it impacts your choices later in the move if you chose to late brake. If you rolled dice to exceed deceleration at the beginning of the turn, you cannot roll dice to late brake later during the same move. If you spent any wear to exceed deceleration at the start of this turn that reduces how much wear you can spend to late brake. If you spent 1 wear to exceed deceleration at the start of the turn, then you can only spend 1 wear to late bake that same turn. If you already spent 2 wear to exceed your deceleration this turn, you may not spend wear to late brake. Late Braking After Entering a CornerIf a car late brakes after entering a corner they may lose some or all of the advantage they may have bought with wear or skill earlier in the corner. To determine how fast the car can go in the same corner next turn, pretend that the car entered the corner at its new speed, after the late brake. It is usually better to late brake before entering a corner but this situation can some up if a car fails a forced pass in a corner and has to late brake inside the corner. Slipstreams and SpeedSpaces gained from a slip do not change the speed of the car. This is especially important if a car carries a slip into a corner � which is legal. One Car Slipstreaming Two and Two Cars Slipping OneThere are times when a car could slip either of two different cars. On the right you can see that the green car could slip either the blue car or the red car. The green car can make that decision when it is their turn to move. 
There also can be times when two cars could slip the same car in front of them. In this case, only one car may take the slip. Below you can see that this time both the red and blue cars are behind the green car. Assuming both cars could otherwise take a slip from the green car, the first car to do so gets the slip and prevent the other car from getting a slip. 
For instance, if the red car moved before the blue car but either could not take the slip because it was going faster than the green car or decided not to take the slip space then the blue car would still have that option. However, if the red car moved first and took the slip, then the blue car would not be able to. SpinsA spun car stops in the first space that required the chance roll or the space it was in when otherwise forced to spin. Change its current speed is to 0 by picking up all speed cards in front of the car�s set-up. A spin can also be indicated by turning the spun car backwards on the track. A car that stalls on the grid is considered to have spun. Next turn, the spun car will plot the slower of its acceleration and start speed and may not test these attributes. For example, a spun car with an acceleration of 40 and a start speed of 60 would go 40 next turn � the lower of those two attributes. The car can only go slower than this if the corner spaces it navigates requires it to do so. A spun car will also moves last among cars in its row regardless of their speeds and track position. A spun car may not block a forced pass attempt. A spun car may not continue to use a racing line it spun on but may use any upcoming racing lines, even in the same corner. A spun car may not exceed the speed of the corner it spun in. CrashesNote the space the crash occurred in and place the car upside-down and next to the track. This car is out of the race. For the remainder of this turn if any other cars reach or pass the row that this crash occurred in, they may become involved in the crash. Crash InvolvementWhen a car does reach or pass that row, it must roll a chance with the following modifiers in addition to any skill they spend on that roll.
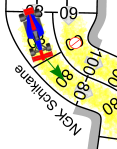
Any spins or crashes that might occur as a result of this chance roll take place in the first space where that car reached or passed the crash row. If a car reaches or passes more than one crash, it will have to roll a chance to avoid each one separately. Planning ErrorsIf a driver is attempting to go a speed higher than they can achieve even if they test their acceleration and/or top speed, their speed should be reduced to the highest speed they could reach if they successfully test their acceleration and/or top speed. If a driver does not play a speed card for this turn, consult the historical driver rules and assign that car a speed for 0-wear historical driver option without tests and as little wear as possible. Intentional SpinsA car may not choose to decelerate more than they can pay for. If a car is forced to decelerate more than it can pay for because it is blocked or failed a forced pass, the car spins automatically. Race Finish, Spins, and CrashesCars that crash the turn they finish the race are considered to have not finished the race. Cars that spin the turn they finish the race are considered to have finished last among other cars that finished the race that turn. [ed. note: The note about obeying corners after the finish was moved up to the section on race finish.] 
On the right, we see a dramatic race finish at Monte Carlo. The blue car would have won but spun and will end up finishing 4th. The red car ends up winning. The green and yellow cars have their nose on the line. Green is closer to the red and white striped side of the track and so finishes 2nd. Yellow gets 3rd. Orange did not finish the race this turn. What if I break my engine close to the end of the race?If a car suffers engine failure (damaging the top speed or acceleration after having damaged either the top speed or acceleration previously this race) within sight of the start-finish line, the car is not immediately removed from the track but is instead given a speed equal to half their speed after failing the test (round down) and then moved. If the car crosses the finish line this turn then it is considered to have finished the race. Otherwise, the car is removed from the track.
|