Using the historical drivers system, you can add famous open-wheel racers who will drive themselves in your race.
These optional rules allow you to race in a larger field without needing as many opponents, test your skill against the best in the world, and even play CFR solitaire. Currently, the historical driver system supports only the base game without any other optional rules.
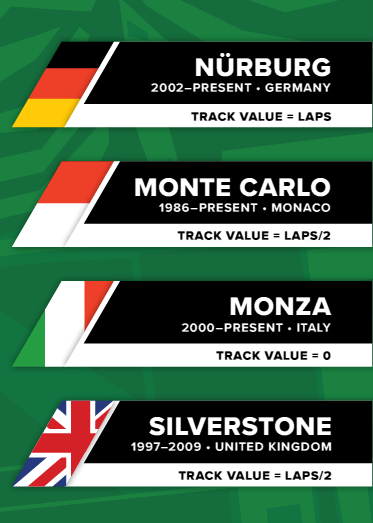
| Track Value |
|
|
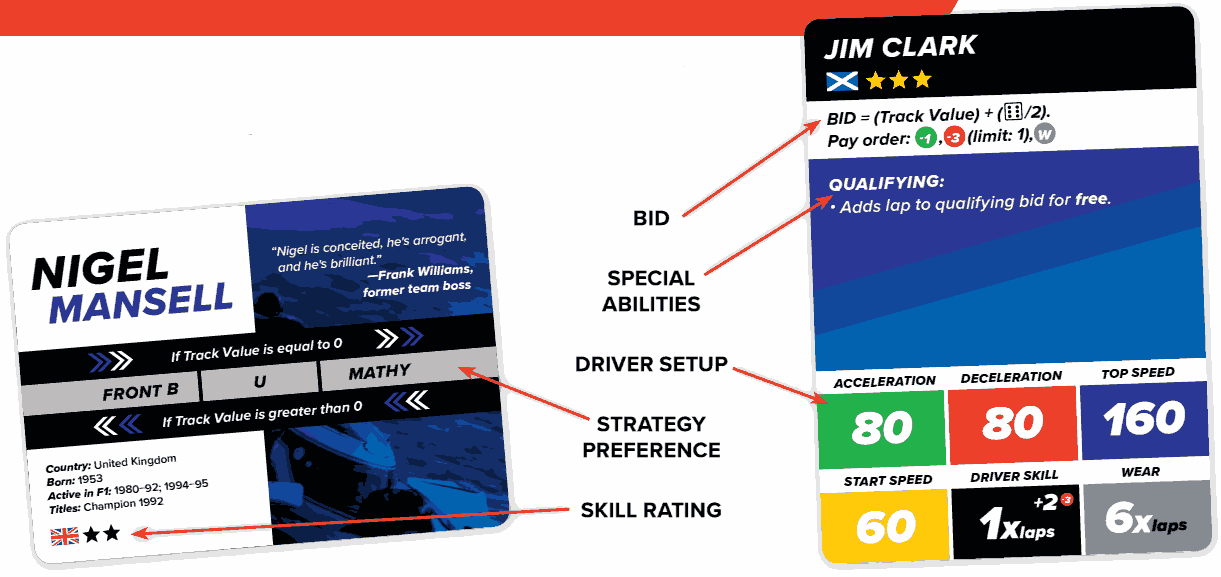
The number of stars on the historical driver’s card is a SKILL RATING. Experienced drivers should fare well against one-star historical drivers but have difficulty against three-star drivers.
When historical drivers are selected, look at the STRATEGY PREFERENCE for each and place the driver card at the top of their preferred strategy sheet. All drivers have three strategies they prefer in order -- from left to right or sometimes the reverse depending on TRACK VALUE. If the driver's first choice is not available because another driver has already claimed a card containing the strategy, use the driver's second or third choice.
Provide historical drivers with a Speed Deck and the skill and wear chips that they will need for this race based on their car set up.
After both historical and human drivers are set up, humans bid for pole in the normal manner. After human bids are revealed, determine the bids for each historical driver. Each historical driver card includes a formula or multiple choice based on the roll of one die. Historical driver cards also note what combination of skill and wear the driver will use pay for their pole bid.
For example, the BID on the above historical driver card means that Jim Clark will pay for his pole bid with green skill, then use 1 red skill, and finally use wear as needed.
Some historical drivers gain bonuses to their pole bids. Drivers do not lose any skill or wear for those bonuses, but the bonus value is added to the driver’s bid. You can use extra wear or skill from the box to note pole bid bonuses.
Now that both human and historical drivers have bid, place all cars on the starting grid as normal.
| Tactic Symbols |
  1 or 2 wear, starred or not 1 or 2 wear, starred or not  1 or 2 wear, only if starred 1 or 2 wear, only if starred  Roll a chance Roll a chance  1 red skill instead of a chance 1 red skill instead of a chanceA STAR (  ) indicates a particularly effective use of wear. Symbols with stars only match other symbols with stars. Symbols without stars match their starred equivalents. ) indicates a particularly effective use of wear. Symbols with stars only match other symbols with stars. Symbols without stars match their starred equivalents. |
At the beginning of every turn, humans go through the planning phase normally – revealing their speeds for this turn when everyone is ready.
The speed that each historical driver will go this turn is not set until it is time for them to move. This is where the strategy card comes into play.
Each strategy card is split into 4 or 5 phases which allows the Historical Driver to modulate its approach as the race progresses – maybe starting the race aggressively or conservatively or using wear evenly though out the race. Each phase includes at least two different tactics in order to create some unpredictability. Each phase also includes a set of instructions for how to deal with common die roll opportunities.
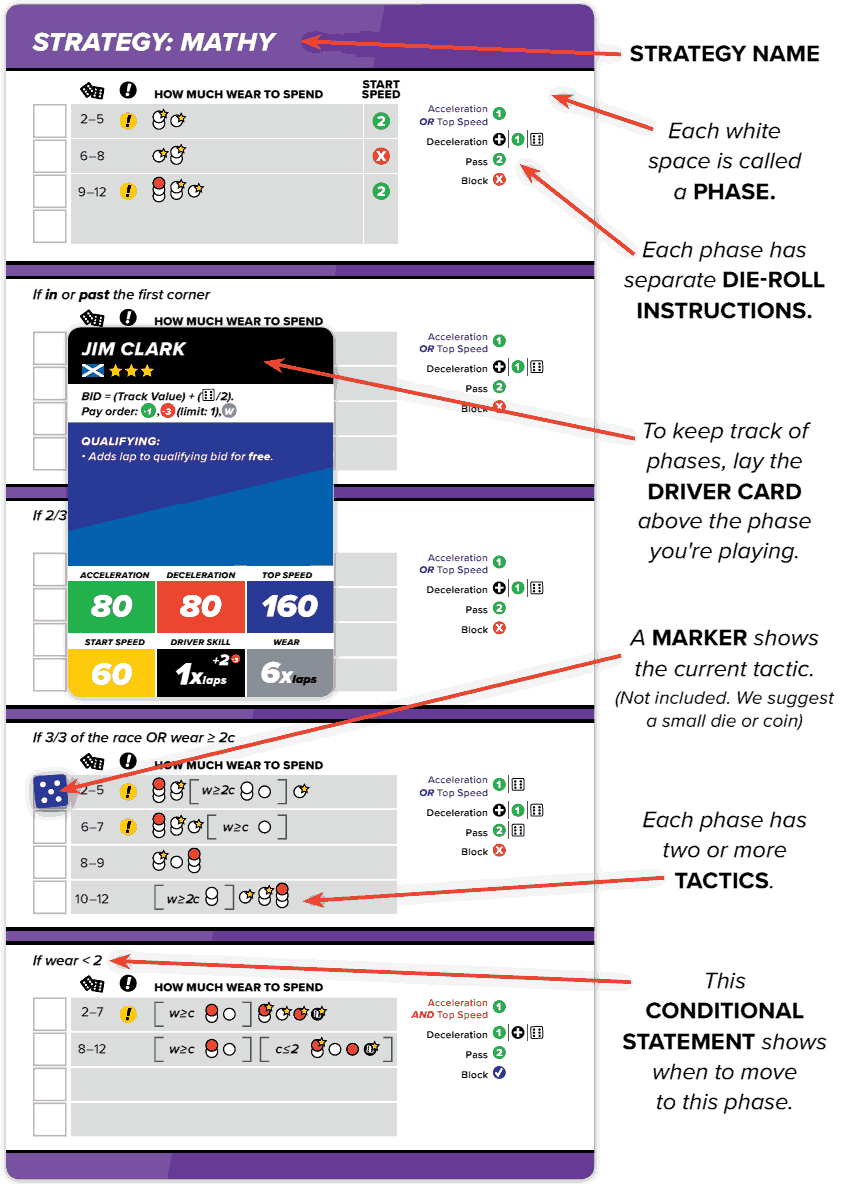
If this driver’s marker was set aside last turn, we must reset the tactic. Roll two dice and place the marker next to that line in the current phase.
| Finding a Match |
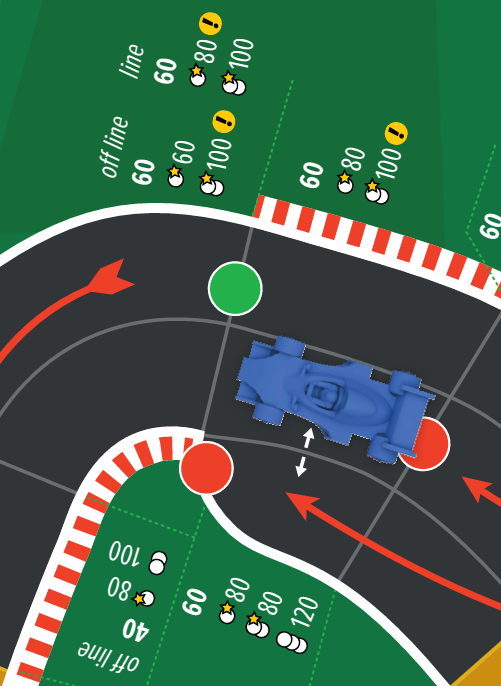
Notice the arrows near the space Blue is on. This means Blue will follow the notations on its right. Match the notation symbols with the tactic's symbols. Nothing matches |
Now look at the line of circles in that tactic. Each symbol represents the amount of wear (or sometimes red skill or chances) that this driver plans to use in the next corner.
Chance and red skill symbols can be combined with wear symbols. Read as "spend 1 wear + roll a chance," etc.
If this car has enough wear and/or red skill remaining to pay for the first symbol in the tactic, then we check the track for that symbol. Historical drivers do not use red skill as a die roll modifier, they use them to automatically pass chance rolls.
Next to the track are a series of blue notations. Each set of notations will include some number of tactic symbols next to speeds or speed formulas.
Some sets of track notations span a number of rows, some apply only to part of a row. The white arrows on the spaces indicate which set of notations to follow. Find the track notations that apply to the space that the historical driver starts this turn in and find a match to the symbol from the tactic.
If there is no match, go back to the tactic to find the next symbol to look up on the track.
When a match is found, the corresponding speed in the track notation is the driver’s target speed.
If no match is found, use the speed that does not have a symbol next to it. All spaces will have at least one of these.
The tactic below includes a conditional statement inside the square brackets. If the formula at the beginning is false then ignore the content of the brackets.

“W” is this car’s remaining wear and “c” is set by the value in the most recent corner, based on the number of laps remaining in the race. "C" is roughly how many slow corners remain in the race. Look for the most recent blue steering wheel ( ) on the track. It will tell you the current value of “c” or “2c” based on which lap it is.
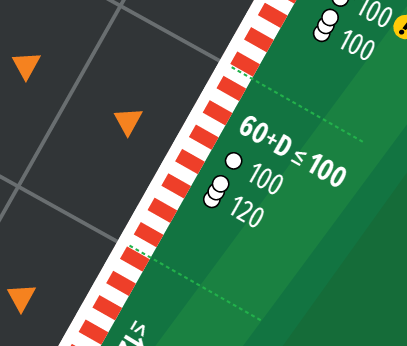
Sometimes the speed next to a particular symbol on the track is expressed as a formula. The most common formula are a speed “+D,” “+D+D,” or “T-A.”
When a speed is given as a formula it is sometimes followed by a limiter (example on the right). This keeps the car from going too fast. Limiters like this are also often applied to an entire row regardless of the symbol.

After you find the target look to see if there is an exclamation point next to that speed on the track. This indicates that the car will start the turn 20 mph faster if there is another (not spun) car in the same row.
Historical drivers will only do this if there is an exclamation point in the car’s current tactic. Some drivers have a cheat that they always act as if they have that exclamation point in their tactic.
If the car reaches a corner this turn after plotting 20 mph faster, it can either take a lane through the corner that spends the correct amount of wear or consulting the car’s die roll options for “D” which could result in the car spending a red skill chip or an extra wear in the corner.
Historical drivers largely follow the same rules as human drivers. It is possible that the historical driver cannot achieve their target speed because of how fast they went last turn, their acceleration, deceleration, or top speed.
| Die Roll Instructions |
|
|
If this happens, we next consult the die-roll instructions for this phase. Die roll instructions tell you what to do if a car could test to get closer to its target speed or is required to late brake or could force pass or block a pass.
The first line of the die roll instructions indicate if a car will test or spend skill to exceed its acceleration or top speed. In the example to the right, the car will spend 1 green skill to automatically increase either acceleration or top speed, but not both on the same turn. It would say AND instead of OR if the car would exceed both.
The second line indicates what the car will do if it needs to test decel or late brake. When more than one symbol is present, read them from left to right.
Now that we know how fast the car is going, we move the car accordingly. Keep in mind how much wear the car is trying to spend as you approach or enter corners.
Historical drivers normally default to the red-and-white-striped side of the track but will line up for slips if it makes sense. Before corners, historical drivers will sit in the most advantageous space for their next turn. This can be a judgement call, but lines are often best.
If a Historical driver can take a slip it will. If taking the slip would put the Historical car into the corner, use your judgement.
This system does not completely spell out how to move historical cars. Use your own judgment to fill in any blanks.

If the car passes or enters a row that is marked by a blue steering wheel () set the marker aside and check conditions to see if the next phase should be used when the car resets its tactic next turn. Most of the time a steering wheel appears in the first row of every corner. Always spend at least one corner in each phase.
Conditional statements for changing phases can refer to laps (total number of laps to be run this race) or which third of the race the car is in (see the core rules for a reminder of how to measure). Use the position of the next corner to determine which third of the race the car is in.
![]()
 Spend 1 green skill
 Spend 2 green skill
 Spend more wear or a red skill in the corner instead of slowing down If possible
 Do not do this
 Roll dice (use up to
  Block or Forced Pass if that is an option